

How to Use Xcode Simulator to Simulate Location on iOS Devices
In the realm of iOS app development, Xcode is a crucial companion, providing a virtual playground for crafting and testing applications. This article explores iOS simulator location guidelines, optimizing iOS simulator location and Xcode simulator location settings for an enhanced testing experience. Irrespective of your expertise level, whether you’re an experienced programmer or a newcomer to app development, understanding these essential aspects can significantly enhance your proficiency. Now learn a full guide about Xcode simulator location.

How to Use Xcode to Simulate Location on iOS Devices
Xcode simulator is a built-in tool in Apple’s Xcode development environment that lets developers test and preview iOS, iPadOS, watchOS, and tvOS apps directly on a Mac without needing a physical device. It mimics the behavior of Apple devices, allowing you to run apps, interact with the interface, test different screen sizes, and simulate various conditions like GPS location, battery levels, or network status. This makes it especially useful for app development, debugging, and experimenting with features before deploying to real hardware.
Here’s a step-by-step tutorial on how to utilize Xcode to simulate a location on your iOS device using the Xcode simulate location feature:
- Before You Begin: Create New Project
- 1. Stimulate Static Location
- 2. Enter Location Manually
- 3. Using GPX Files
Before You Begin: Create New Project
Step 1 Ensure you have an Xcode account, go to “Account,” click “Download Tools,” and let Xcode install.
Step 2 Run Xcode, connect your iOS device to the computer.

Step 3 In Xcode, navigate to “File” > “New” > “Project.”

Step 4 Choose “Single View App,” enter the Product name, and proceed.

Step 5 You will see the screen as following: Navigate to “Xcode” > “Preferences” > “Accounts” > “Apple ID” to log in.

Step 6 Select the team, press “&;”, and start the building process.

Step 7 Once the build is done, access the Maps application. Then choose where to save the new project.

1. Stimulate Static Location
To change the location in the iOS simulator using Xcode and the iOS simulator change location feature, follow these steps:
✅ Through scheme modifications:
Step 1 To access the Edit Scheme, Begin by opening the “Product” menu. Within the “Run” menu, look for the “Options” tab. This is illustrated in the screenshot provided underneath:
Step 2 Ensure that the “Allow location simulation” option is checked. You can then select a specific location from the available options. This chosen location will serve as the simulated position when you launch the app on the simulator or device.

✅ From the top menu bar:
Step 3 From the Xcode menu bar, select “Debug,” then click “Simulate Location.” You will observe the same default location options, as depicted in the screenshot below:

By following these steps, you can effectively configure location simulation for testing and evaluation purposes within the iOS Simulator using Xcode’s capabilities.
2. Enter Location Manually
To manually change the location in the Xcode 13 Simulator, follow these steps:
Step 1 Open your app within the Simulator.
Step 2 Navigate to “Debug” > “Location” > “Custom Location” in the Simulator menu.

Step 3 Input the specific longitude and latitude coordinates for the desired new location.
Step 4 If you’re uncertain about the coordinates for the new location, you can easily find them using tools like Open Street Maps or Google Maps. Simply click on the location on the map, and the coordinates should become visible.
By following these steps, you can precisely use Xcode 13 Simulator to set location for accurate testing and validation of location-dependent functionalities.
3. Using GPX Files
For efficient location changes, Xcode provides a solution using GPX files, simplifying the process and saving time. GPX files, formatted in XML, streamline location spoofing, especially when unfamiliar with the exact coordinates of the desired location.
Here’s how to use GPX files to stimulate location changes in Xcode:
Step 1 Go to the “Active Scheme” section and click on it. Click on “Edit Scheme.”

Step 2 Within the “Run Scheme” > “Options” tab, check the “Allow Location Simulation” checkbox.
Step 3 Open Xcode’s main menu, then choose “Run (Debug)” > “Simulate Location” > “Add GPX File to Workspace” to import the GPX file.

Step 4 Select the downloaded GPX file. If you revisit “Run (Debug)” > “Simulate Location” > “Add GPX File to Workspace,” the GPX file will be readily available for selection.
Step 5 Within the Debug area of Xcode, you can further fine-tune the location by selecting the location arrow symbol.
By following these steps and leveraging the stimulate location GPX Xcode capability, you can effectively manage multiple location changes in your app development process, enhancing efficiency and accuracy.
Pros and Cons of Using Xcode Simulator Location
Here are the pros and cons of using Xcode simulator location on device:
- Testing capabilities.
- Visual interface builder.
- Swift programming language.
- Integrated development environment.
- Continuous integration and deployment.
- Learning curve.
- Large file sizes.
- Resource demands.
- Platform limitation.
- Refund policy is not as advertised.
Considering these aspects, Xcode provides a robust platform for developing Apple-centric applications, but it’s essential to be mindful of its limitations and resource requirements.
A Better Location Changer Tool Than Xcode Simulator You Must Know
While Xcode, with its powerful features for app development, can be highly beneficial, it may not align with the needs of those seeking a simpler solution, especially newcomers to the process.
For swift and efficient location changes on your iOS device or seamless simulation of GPS movements, we recommend opting for MocPOGO – Location Changer, a user-friendly alternative MocPOGO represents a versatile application for modifying the GPS location on both iOS and Android devices. Its functionality extends beyond location-based gaming, encompassing any app reliant on location tracking.
168,282 people have downloaded it.
- 1 click to change GPS location on iOS devices without jailbreak.
- Safely spoof iPhone location without detection.
- Instantly fake location on Android devices without root.
- Change GPS location of all location-based games/apps, like Pokemon go, Monster Hunter Now, Tinder, Grindr, WhatsApp, and Snapchat and Instagram, etc.
- Easily simulate GPS movement with custom speeds in AR games.
- Multi-Device control up to 15 devices.
- Support the latest iOS 26/Android 16.
How to Spoof Location on iOS Devices with MocPOGO
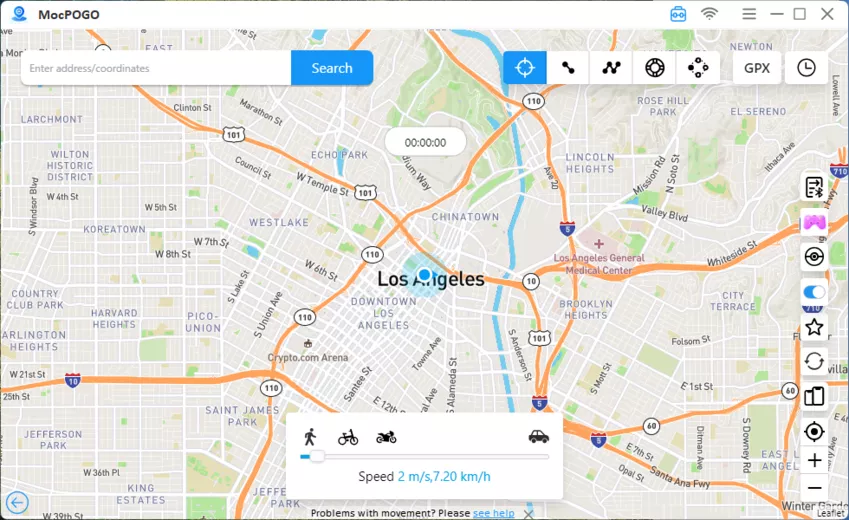
Step 1 Start by clicking on the “Teleport Mode” icon. If your current location appears incorrect, this corrective step ensures accurate positioning.
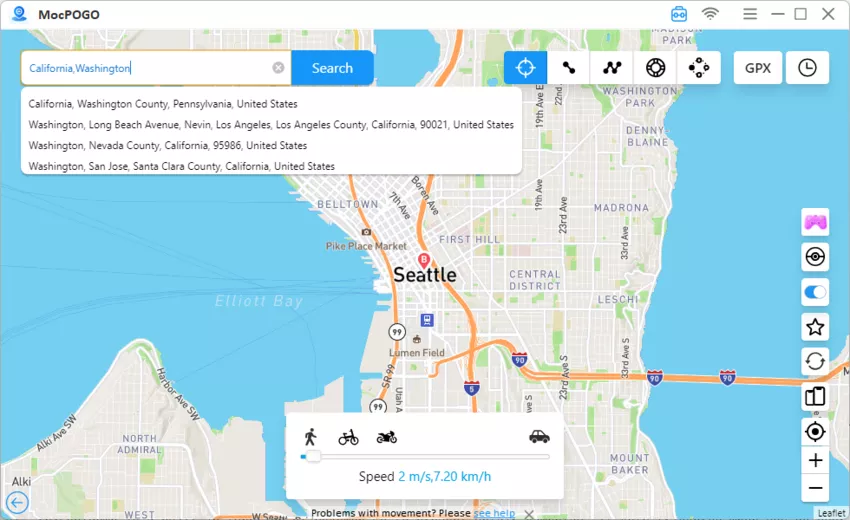
Step 2 Enter the desired location name or input coordinates into the search box. Proceed to initiate the search by clicking the “Search” option.
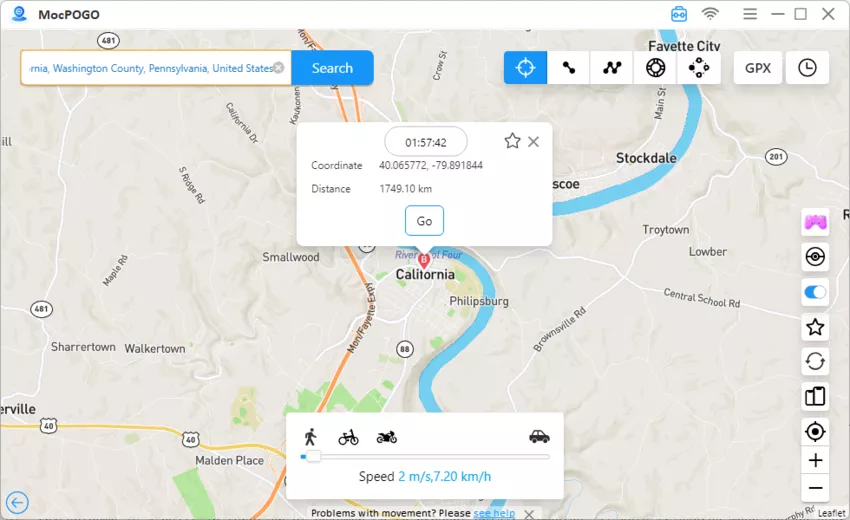
Step 3 Observe the “GO” option presented on the map. By clicking this, your device’s location will be seamlessly teleported to the designated place.
These meticulously outlined steps illustrate how MocPOGO empowers users to swiftly and precisely modify GPS locations, making it a valuable tool for a wide spectrum of location-aware applications.
Note:
You can also download the MocPOGO iOS or Android app to fake location or play games directly.
Also Read: How to Use Cydia Fake Location on iOS 18
Verdict
The process of spoofing GPS on your iOS device can be streamlined with tools such as Xcode simulator location or MocPOGO – Location Changer, rendering the intricate procedure straightforward – merely connecting the device to the computer and choosing the desired location suffices. When executed accurately, this manipulation of GPS allows for accessing content beyond your physical location’s limitations or engaging in location-based gaming, showcasing a myriad of potential applications.
