

A Step-by-Step Guide to Use MocPOGO for iOS
If you are still looking for a iPhone location changer app to fake GPS location, then you must know about MocPOGO for iOS. As a professional location spoofer, it helps you change location on iOS devices without jailbreak. Before using the features, please enable developer mode on iPhone. Here is the detailed steps to use MocPOGO for iOS app. Let’s check out!
Note:
If you are using the MacOS, you need to disable System Integrity Protection (SIP) on Mac. Please follow this guide to process.
Teleport Mode
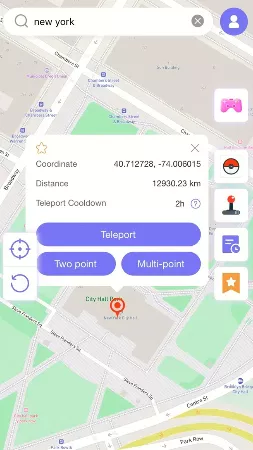
After launching the app, you will see the current location on the map. You can enter the address or coordinates in the search box to change your iPhone GPS location.

Now, select the location and hit “Teleport” on and map.
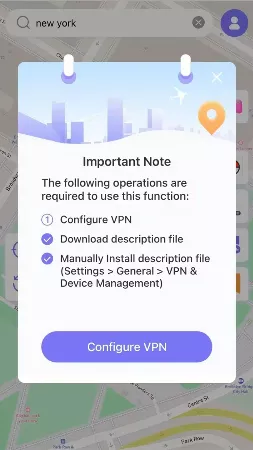
MocPOGO for iOS will ask you to configure VPN, click on “Configure VPN” to go on.
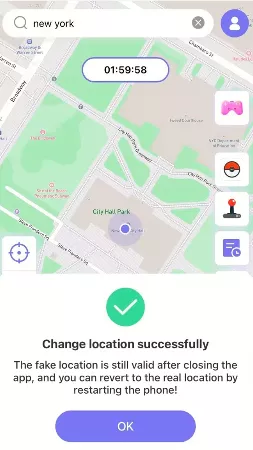
In a second, your location will be changed to there.
Note:
After changing your iOS location, all location-based software will be localized to the fake location.
Two-Spot Mode
Two-Spot mode allows you simulate GPS movements, please select another location on the map and click on “Walk” to control the action.

While moving, you can customize the walking speed. Here are two modes on the tops of the screen. Slide the progress bar to adjust the speed.

Once at your destination, click on “OK“. This will be more helpful if you are a gamer.

Disable Cooldown Timer Feature
After using the Teleport Mode, there is a cooldown timer on the map. This is exclusively for Pokémon GO users. You can disable this feature if you don’t play this game.
Go to the profile and toggle off Cooldown Timer option.

GPS Joystick Mode
GPS Joystick function, which allows you to control your in-game character without actually walking in real life.
Select the “GPS Joystick” icon on the right side, and configure VPN.

A GPS Joystick controller will now appear on your screen. Tap the “Start” button to initiate walking, and adjust the slider to choose your direction.

To zoom in or out of the controller, use the icon located at the bottom right corner (ideal for devices with too small or too large screens). Please hold down and drag the zoom icon instead of clicking it directly.
To exit GPS Joystick mode, click on the “Exit” icon and confirm by selecting “Yes.”

Other Features
Favorites
Collect spots or routes by tapping the “Star” icon on the map.
![]()

View favorite locations and routes with the Favorites button on the right side of the screen.

Historical Record
All previously traveled routes and transmitted coordinates are stored in your history. Access them by clicking the “Time” button.


Sync to the Cloud
MocPOGO allows you to save your locations and routes and sync them with your iPhone through the cloud.
Step 1: Click the “Star” icon on the map to collect the address.

Step 2: Your saved locations and routes can be automatically synced to your iPhone via the cloud. Now you can select the “Export/Import” option in the upper-right corner to save your data permanently.

Resource Search
Want to know the exact location of the Pokemon you’re trying to catch? Try the Resource Search feature to find the Pokemon location and learn more details about the Pokemon, such as Coordiantes, Despawn, Move, CP and Lvl.
Step 1: Click the Pokémon logo of the interface to activate Resource Mode.

Step 2: Enter a specific Pokémon ID or name from the Pokémon list.

To refine your search, click “Filter” on the right. You can filter by:
- CP (Combat Power)
- Level (LV)
- IV (Individual Value)
- Spawn Time
- Distance
- Gender
- Weather

Step 3: Switch to Raid Mode by clicking the appropriate option.
Input a specific Pokémon ID or name from the raid list.

Click “Filter” on the right to narrow down your search. You can filter by:
- CP (Combat Power)
- Egg
- Tier
- Gender
- Team

By using these features, you can easily retrieve the Pokémon Go coordinates for raids or specific Pokémon based on your selected filters.