

How to Share Location on iOS 26 on iPhone 17: The Complete Guide
Sharing your location on an iPhone makes daily life easier and safer. It helps with meetups, family updates, and quick check-ins. For those who have just moved to iPhone 17, the system is pre‑loaded with iOS 26, which brings several adjustments and upgrades to location sharing. So, how do you share your location correctly and quickly on iOS 26? Let’s dive in and find out.

Part 1: What’s New in iOS 26 for Location Sharing
iOS 26 improves location sharing with better privacy and easier management. Apple continues to strengthen privacy tools so you decide what to share and when.
- Simpler privacy control: iOS 26 makes location permissions easier to review and adjust. You can limit access without digging through too many menus.
- More flexible sharing options: You can share your live location or send a one-time current snapshot.
- Smoother app integration: Find My, Messages, and other supported apps work more smoothly together.
- Reliable Apple ID sync: Fewer errors with iCloud and device location sync.
- More user‑friendly interface: Easier to understand for new and infrequent users.
These small but practical updates give you straightforward, reliable location control.
Part 2: How to Share Your Location on iOS 26 (Step-by-Step)
There are 4 easy ways to share your location on iOS 26. Choose the method based on who you’re sharing with and how long you need: one‑time or ongoing.

Method 1: Using the Find My App
Find My is the most direct Apple option for location sharing. It works well when you want to share with a trusted contact for a longer period. It is also the easiest choice for family members and close friends.
- Open the Find My app from your Home Screen.
- Ensure Location Services is turned on.
- Go to the People tab.
- Tap Share My Location and select a contact from your list.
- Choose a sharing duration: limited time or until you manually stop.
- Confirm to send the request. Your contact can now view your location.

Method 2: Using the Messages App
Messages works naturally for location sharing while you chat. It sends your position right inside your conversation, so you don’t need to open extra apps or switch screens. This makes it ideal for quick meetups, travel checks, and last-minute plans.
- Open the conversation with your contact.
- Tap the contact name or the + (plus) icon.
- Select the location sharing option.
- Choose Send Current Location or Share Live Location.
- Confirm permission if prompted. Your location will appear in the chat.
- Stop sharing anytime from the same thread.

Method 3: Using Third-Party Apps (WhatsApp, Google Maps)
Not everyone uses Apple apps. WhatsApp and Google Maps work across iOS and Android — useful when the other person uses an Android device or you prefer a familiar tool.
- Open WhatsApp or Google Maps.
- For WhatsApp: open a conversation. For Google Maps: tap Location sharing.
- Choose Live Location or a pinned place.
- Set a sharing duration if the app supports it.
- Send your location with a stable internet connection.

Method 4: Family Sharing
Family Sharing keeps your households connected with minimal effort. Parents often use it to keep track of their children or to coordinate daily activities. It also avoids repeated manual location sharing.
- Open Settings on your iPhone.
- Tap your Apple ID profile.
- Go to Family Sharing and add members (each needs an Apple ID).
- Turn on Location Sharing for the family group.
- Verify and adjust each member’s access permissions.

Part 3: iOS 26 Location Not Sharing? 4 Quick Troubleshooting Steps
If location sharing isn’t working on iOS 26, it’s often caused by wrong permissions, a poor network connection, or iCloud sync issues. Most issues can be fixed in 1‑2 minutes with these quick checks.
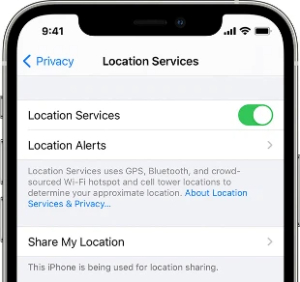
Step 1: Check Location Services & Find My Settings
Location Services must be on for sharing to work. If they are off, your iPhone cannot share your position correctly. Also check Find My settings to ensure the correct device is selected as your location source.
Step 2: Check Network Connection & Background App Refresh
Location sharing needs a stable internet connection. Weak Wi-Fi or mobile data can delay updates. Background App Refresh can also affect location sharing in some cases. Enable Background App Refresh for reliable location updates.
Step 3: Resolve iCloud Sync Issues
Your Apple ID and iCloud account must be properly synced. Otherwise, sharing may fail. Sometimes signing out of your Apple ID and then signing back in helps. It can also fix mismatched device data.
Step 4: Restart Your iPhone & Update iOS
A simple restart can fix small system glitches. If the problem continues, install the latest iOS 26 update to resolve location bugs and permission errors. This step is basic, but it often works well.
Part 4: How to Stop Sharing Your Location on iPhone?
Stopping location sharing is just as important as starting it. You may want to pause sharing for privacy or personal reasons. Apple makes this process easy to manage. You can stop sharing your location with one person or with everyone.
- Open Find My and go to the People tab.
- Select the contact you want to stop sharing with.
- Tap Stop Sharing My Location and confirm.
- If you shared via Messages, end sharing in the chat thread.
- For Family Sharing, adjust settings in your Apple ID menu.

Part 5: Beyond Sharing: One-click to Change Your Location to Anywhere on iOS 26
Standard location sharing works for daily needs, but sometimes you want full control over your GPS position — for privacy, app testing, or location-based tasks. MocPOGO is the perfect solution for your new iPhone.
MocPOGO lets you change your iPhone location to anywhere with just a few taps. You don’t need jailbreaking, technical skills or complicated settings. It works smoothly with map apps, social apps, dating apps, games and all LBS services on your iPhone, giving you true location freedom and privacy.
168,282 people have downloaded it.
- Change GPS location on iOS device without jailbreak.
- Simulate GPS movement with custom speeds.
- Change the location of all location-based games/apps.
- Support GPS joystick to play AR game on PC.
- Multi-Device control up to 15 devices.
- Support the latest iOS 26/Android 16.
The Essential Features You Should Know
- Change GPS location without physical walking: Freely set your iPhone GPS to any city, landmark, or region worldwide instantly.
- Smart route simulation: Simulate natural movement along custom routes with adjustable speed, perfect for gaming or testing location-based apps.
- Works on a wide range of social apps: Change location on WhatsApp, Twitter, Instagram, and more.
- Joystick control: Manual, real-time GPS movement for smooth, flexible navigation in apps and games.
- Privacy protection: Effectively hide your real location to protect personal privacy and avoid unwanted tracking.
- Full cross‑platform support: Works seamlessly with iOS, Android, Windows, and Mac.
- POGO Assistant for iOS: Boost your Pokémon GO experience with IV preview, quick catch, enhanced throw, auto raid, and auto egg hatching.
How to Change Location on iOS 26 with MocPOGO
The general process is straightforward and beginner-friendly.
Step 1 Download MocPOGO on your iPhone.
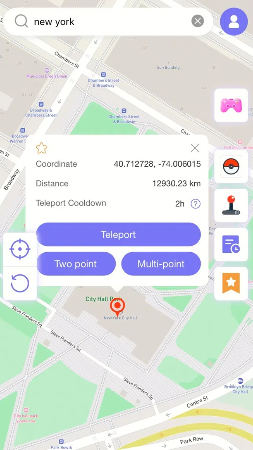
Step 2 Enter the target address or coordinates in the search box.
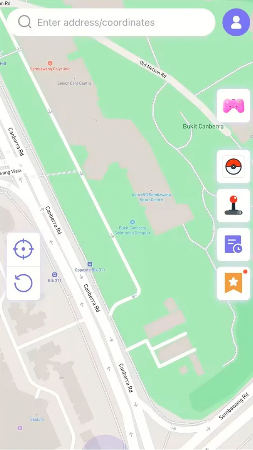
Step 3 Now, select the location and hit “Teleport” on and map.
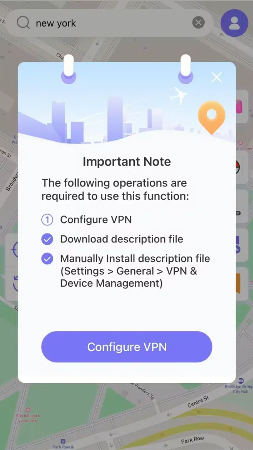
Step 4 MocPOGO for iOS will ask you to configure VPN, click on “Configure VPN” to go on.
Step 5 Your location will be changed to there.
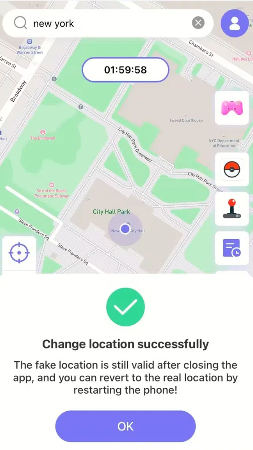
Conclusion
Sharing location on iOS 26 is fast and flexible using Find My, Messages, third‑party apps, or Family Sharing. If location sharing fails, checking permissions, network, iCloud, and iOS updates usually resolves the problem quickly. You can also stop sharing your location anytime for better privacy.
For advanced control beyond native sharing, MocPOGO gives you a safe, reliable way to change your GPS location. It’s a must‑have tool for better privacy and flexibility.