

[2025] How To Change Weather Location On iPad
The newly introduced Apple Weather app on iPad is more than just a utility; It has set new standards for weather updates on iPads. Using this app, you can monitor weather conditions by changing locations and setting alarms. It can be helpful for activities like travel plans, commuting, work requirements, outdoor plans, monitoring tasks, and many more.
Sounds amazing? If you are also an iPad user and want to know how to change weather location on the iPad and how to set weather alerts, then read this article carefully. We will share everything you need to know with step-by-step instructions.
Part 1. Use All the Features of The New Weather App for iPad
The Apple Weather app is designed with advanced features to give users a visually appealing and clear weather forecast experience on iPads.
It provides real-time updates on weather components like wind, rain, precipitation, sunlight, temperature, etc., through a very intuitive and user-friendly interface. It allows tracking weather conditions in current or other locations with simple steps.
Moreover, it also offers the option to set weather alerts for taking proactive preventive measures against harsh rainy, sunny, windy, or snowy conditions.
1.1 Add More Cities Or Your Current Location To The App
Apple’s Weather app supports updated weather forecasts of multiple cities/locations at a time to enhance convenience and preparedness by understanding different environments. This feature amazingly allows users to supervise different areas or locations to plan ahead, make better decisions, and stay informed about the climatic pattern of the areas of their choice. To add multiple cities to your Apple Weather app list, follow these steps.
Step 1: Open the app and ensure a good internet connection.
Step 2: Tap the button at the top left side of the screen. This will show you the existing list along with a search bar.
Step 3: To add a city, search it on the search bar and tap the Add button. To remove a city, select and swipe the city from the right to the left side, and it will automatically disappear.

As far as the current location is concerned, Apple’s weather app automatically tracks and shows weather conditions in the current or live zone. It just demands to use your device’s location under the privacy settings. Once you give access to your live location, no further manual setting will be required for this purpose. Follow these steps to give access to your live/current location.
Step 1: Open Settings > Privacy & Security > Location Services .
Step 2: Now, look for the Weather option and tap on it.
Step 3: Now choose the option to give your live location access.
1.2 Set Up Weather Alerts
Weather alerts are another amazing feature offered by this app. This feature helps users to take precautionary measures or smart and safe actions against whatever weather comes their way. Overall, this feature helps to act effectively and cleverly to climatic changes to protect life and property. Here are the steps to set up weather alerts on this app.
Step 1: Open the Weather app and tap on the button at the top left side of the screen. It will open the cities list/ panel.
Step 2: Tap on the three dots icon on the top right corner of the panel.
Step 3: Choose the Notification option and turn on the weather alerts for the city/location you want.

Part 2. How To Change Weather Location On iPad
- Method 1: Use MocPOGO to Change Location on iPad🔥
- Method 2: Modify the Widget’s Main Placement for the Weather App
- Method 3: Use the Search Field on the Weather App to Enter the Location
Method 1: Use MocPOGO Location Changer on iPad 🔥
168,282 people have downloaded it.
- Change GPS location on iOS device without jailbreak.
- Simulate GPS movement with custom speeds.
- Change the location of all location-based games/apps.
- Support GPS joystick to play AR game on PC.
- Multi-Device control up to 15 devices.
- Support the latest iOS 18/Android 15.
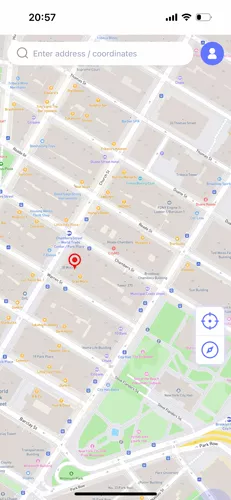
Step 1 Launch MocPOGO for iOS on your iPad and turn on your live location.
Step 2 Go to the map and select the location from the map that you want to be changed through MocPOGO for iOS.
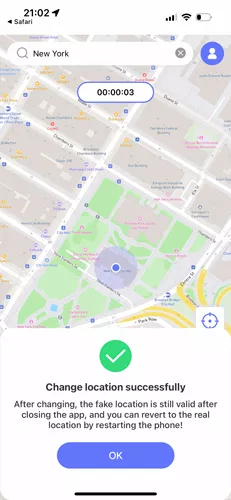
Step 3 Select the location and tap on the Teleport > Configure VPN options.

Step 4 Your location will be changed in a second. Tap on the OK option.
Method 2: Modify the Widget’s Main Placement for the Weather App
Step 1: Look for the Weather app widget from your iPad’s home screen.
Step 2: Tap and hold the widget for a few seconds. This will show the hidden options/ menu.
Step 3: Select the first option of Edit Weather > Location from that menu.

Step 4: Search the location on the search bar and select the one you want from the suggested results.

Step 5: The location from the Weather app widget will automatically change after selecting the location. If it does not work, update your iOS version and try again.
Method 3: Use the Search Field on the Weather App to Enter the Location
Step 1: Open the Weather app on your iPad and click on the menu icon at the top left corner of the screen. It will open a panel with a list and search bar.

Step 2: Type and search your desired location from the search bar and select the one from the suggested results.

Step 3: Tap the Add button to add the location to the list. Your new location will be added from where you can track its weather conditions.
Warming Tips: How to Quickly Check the Current Weather Directly From the Home Screen
Home screen widgets are the best way to get everything done in a quick mode. They provide quick access to applications’ functionalities, features, and information. Apple’s Weather app can also be accessed quickly in a second through its home screen widget. Follow these steps to add an iPad’s Weather app home screen widget.
Step 1: Tap and hold the Weather app on your iPad’s home screen.
Step 2: Tap on the Edit Home Screen > + button from the top left side of the screen.
Step 3: Search for Weather from the screen and select the widget of your choice.
Step 4: At the end, tap on the Add Widget button. The widget will be on the home screen.

Final Words
The recently launched Weather app on iPad upholds the tradition of innovative and user-friendly releases by Apple. iPad users require guidance to use this latest and updated application. For their ease, we have explained how to change the default weather on iPad in detail. And also introduce the Best Location Changer — MocPOGO. Follow the steps and learn to accurately use Apple’s weather app on iPad and make smart decisions regarding how the weather conditions revolve around the day and location.

